You’re not 100% sue why, but the first time that you see your final personalised clothing and personalised t shirt garments you couldn’t do anything but raise your hand to your head and let our a cry of horror.
This is a common reaction when the printed garments that you’ve ordered don’t turn out the way that you expected. There are many reasons why printing can go wrong and more often that not it’s down to the artwork files that the printing company has received.
In this article, I’m going to look at the common mistakes that are made and also give advice on how they can be avoided in the future.
1. Is your artwork of sufficient quality?
Image resolution is one of the most common mistakes when it comes to printed garments not looking how you expected. It’s important to remember that, when sending an artwork file, this is the file that’s going to used to print with. Therefore, if the quality of the image provided isn’t the best – this is going to be reflected in the final printed product.
Remember, wherever possible, have your image at a resolution of 300 PPI (pixels per inch) as this will remove any unexpected image blur which can happen when your image is scaled up to be printed. Also, beware of using images that have been sent to you via messaging apps such as Facebook Messenger or WhatsApp. These images are compressed so that they can be sent and received quickly within the apps. This compression makes them unsuitable for T shirt printing.
2. Clothing colour and artwork:
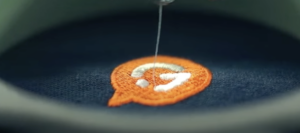
Printing onto dark coloured garments requires an extra step in the printing process (expect when using CAD CUT vinyl or embroidery). This means that we have to be extremely careful with our images. A light coloured image on a dark fabric requires a base layer of which ink which needs to be printed first. Don’t worry so much about this part as the printing company will figure out if this layer needs to be applied.
The crucial point of this is whether you need to use white or transparent backgrounds. If your image has a white frame around it then this will actually be printed with white ink. This means that if the background hasn’t been correctly deleted from the file that you send to the printing company then this will be printed – even if you don’t want your image to have a background colour. If you remove the background then you need to save your artwork as a .PNG file as this type of file supports a transparent layer. Other file types include .PDF, .PSD, .EPS or .AI.
3. Pixelated borders:
So, you’ve submitted your file in .PNG with a translated background but your printed garment still has pixelated borders?
The first thing you need to double check is the artwork file being an appropriate resolution so the first thing you need to do is refer to point 1.
You’ve checked this and the resolution is 300 PPI. Don’t worry, there are still things that can be done to to correct pixelated edges when erasing the background.
- Select your background. You can use the magic wand tool, or you can manually select it using the polygon lasso tool. Another option for this, when selecting a block colour (such as a white or a black background) is to use the colour range selector which is found in the selection menu.
- Once you’ve selected the background layer, you want to smooth the edges out. Select > Refine edge. In this window, you can adjust the different parameters to improve the selection. It’s recommended that you consider smoothing and displacement of the edge. Once you see the result is as expected, the background can then be removed.
4. Text:
I should note that if we receive a design that’s saved in a .PDF, .PSD or .AI and it contains some text (even if it’s only one letter), we need to convert this text into curves, or attach the font file with the design. If we don’t have the correct font when the file is opened, the text will automatically be modified into a default one that we have.
5. Vector files…what are they?
There are some printing techniques which require files to be saved in a vector format, this includes screen printing or printing on vinyl. Vector files are great because when they’re resized there is absolutely no loss in quality. In fact, a vectored file can be resized from the size of a postage stamp to the size of a building whilst still retaining the smooth lines and curves and it suffers no pixelation.
Another reason why this type of vector format is used is because the machines that are used need the paths to define a perfect cutting edge and allows for proper finishing of the materials. We must avoid using details which are too small for printing as the machines used can’t play around with rigorous accuracy.
If you have any questions regarding how to correctly prepare your files for optimal print quality, do not hesitate to contact our printing experts.